Mini camera
Record the wonderful life, Restore the truth


-
User Manual
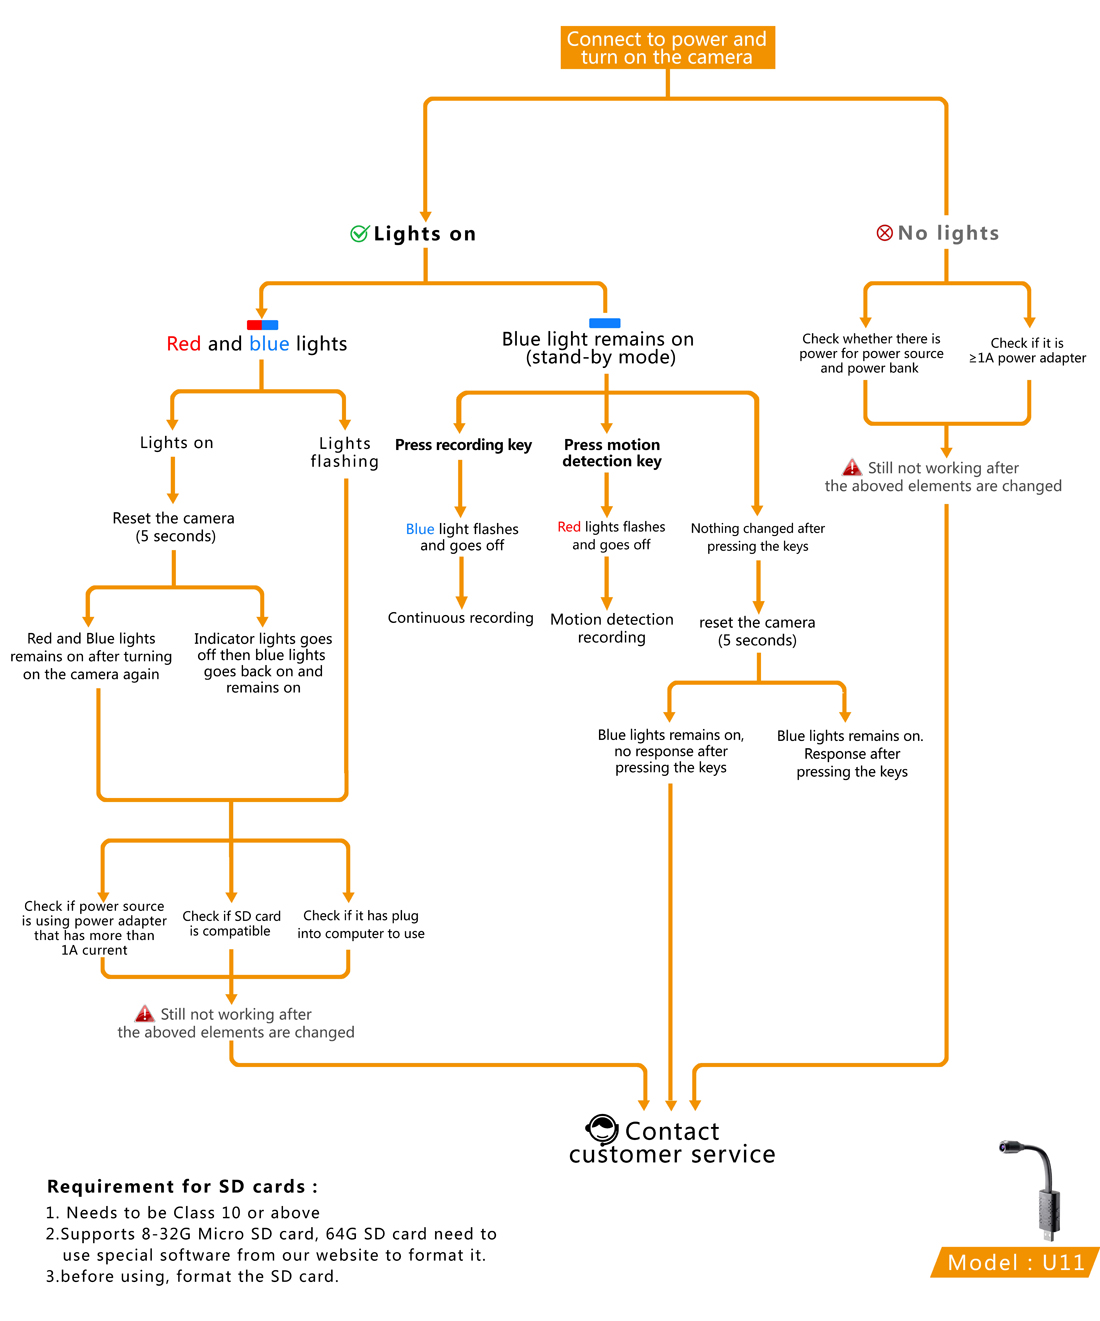
Turn on:
Connect to power source (phone charger plug or power bank, power source requirement:5V/1A). Blue light remains on and the camera is in stand-by mode.
Turn off:
when in stand-by mode, long press the motion detection key for 2 second to turn off.
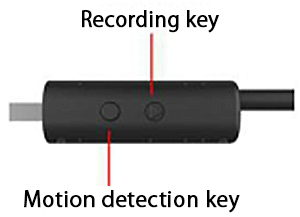
Key indicators:Triangular key: recording
Circular key: motion detection recording

Continuous recording:
When in stand-by mode, press recording key (blue lights will flash 3 times and go off) camera starts to record.
Press the recording key again,(blue light remains on) the camera will save the video and re-enter stand-by mode.
Motion detection:
During stand-by mode, press motion detection key (red lights flashes 3 times and then go off) the camera will enter motion detection mode. When an object moves in front of the camera, the camera will automatically record for 1 minute and then re-enter arming stage; when an object moves in front of the camera again, the camera will re-enter recording mode.
The camera will repeat this way. Press the motion detection key again (Blue lights remain on) the camera will re-enter stand-by mode.
Time modification:
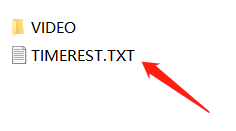
When turning on the camera and begin to record, a file name “TIMEREST.TXT “will automatically form in the TF card. Open the file and modify the time to current time and save the file. Safely eject the disk and record again. The recording time will be automatically updated. (The system default setting does not display the time. If you want time to be displayed on the recording, you are required to set it before use.)
You can also insert the TF card into the card reader and connect the card reader to the PC to set the date and time. Change the date and time without changing the format.
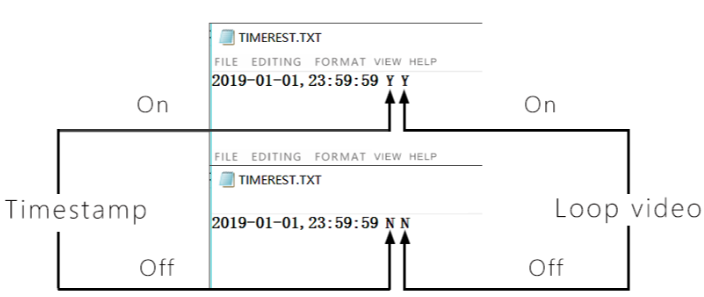
1.The first letter represents whether the recording displays the time and date. ( Y means yes and N means no)
2.The second letter represents whether loop recording is on. ( Y means yes and N means no)
Loop recording:
If Loop video was activated, when the memory card was full, the latest video files will automatically cover the earliest video files.
If Loop video was deactivated, when the memory card was full, the video recording will automatically stop.
Video reading:
A. You can take out the TF card and read it through a card reader.
B. Or you can connect the camera to the computer to activate card reading.
Resetting:
If the camera appears to be malfunctioning or no response to any kind of operation, resetting can be done to the camera.
Resetting method: use a toothpick to poke the resetting hole once and wait for the indicator light to go off to finish the resetting procession.
Technical Specifications:
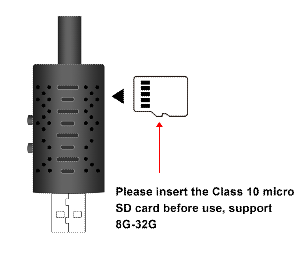
Supported TF Card capacity :8-32G
Memory footprint: approx. 10G/hour
Video Format: AVI
Recording resolution: 1920*1080P
Product weight: approx. 21g
Product dimension: approx. 16*2.7*1.5cm
Notice:
A. Before use, TF (microSD) card must be inserted to the camera. The camera can’t record without TF card. ( recommended to use C10 TF card).
B. Format the TF (microSD) card to FAT32 before use. Doing this, however, will remove all data from the card. Make sure to back up any data before formatting.
C. Aimed the camera at the recording object, making sure the camera is at least 50 cm away from the recording object to get a correct, natural colored, clear scenery, stable recording.
D. The camera takes about 10G memory per hour, maximum supports 32G memory card.
E. The power consumption for the camera is approx. 150 mAh per hour.
Note:
When using the camera, it should maintain a certain space with other objects, let the camera be in use in ventilation areas.
When the camera is in use or in charge, it is forbidden to use any object to close the outer casing and the surrounding heat release holes. Blocking the vents can cause the device to overheat. If the camera is damaged caused by this reason or other serious consequences, the seller is not responsible or bear any legal consequences.
Use occasion: please abide the national laws and regulation, do not use this product for illegal purpose, or all consequence will be in your responsibility.
Working temperature: 0-45°C, to prolong battery life, the camera best be used in room temperature. any object blocking the outer covers or its ventilation holes are prohibited.
Working humidity: 20%—80%, please do not use this product in a humid working environment. The product does not have waterproof features.
Other notice:This product is a precision electronic product, do not let it be in contact with strong impact or vibration; Do not use this product in strong magnetic or electronic field or near flammable and explosive products.
-
Common problem
Attention problem:
1. The camera must be inserted into the TF card, otherwise it cannot be recorded;
2. The camera occupies about 6G memory space per hour, and supports up to 32G memory card;
3. The camera consumes about 130mAh per hour during the day, plugging in the mobile power or using it;4. Align the lens with the subject and keep a distance of 50cm or more from the subject. This will result in an image with correct color, natural color and clear picture.
5. In the case of abnormal conditions, please place the toothpick on the reset hole and perform reset treatment.
6. Do not use the device for illegal purposes.Troubleshooting:

FAQ:
Q: How long can this camera be in a hot car?
A: As long as the power is supplied, the camera can always record.
Q: In what format will the video be displayed on my iPhone: AVI, MOV?
A: The video will be displayed in MP4 format.
Q: When using motion detection to shoot, please tell us the operating distance?
A: Within 5 meters.
Q: Do SETTIME files have to be re-doed each time they are turned on?
A: Yes, it has to be set every time.
Q: My camera only records 8-11 seconds of video. Can I change the configuration to record more seconds?
A: Format the SD card and try again
Q: I have read the instructions before using it, it will light red and blue, and will not stop flashing. Msd memory is new, C10 type.
A: 1. In this case, all you need to do is disconnect the power, remove the SD card, then put it back in the camera and reconnect the power.
2. You can try to replace a new SD card.
Q: I have a question about infrared. If I don't want to turn it on or off automatically, how do I set it up?
A: It is automatically turned on and cannot be set.
-
Memory card formatting steps
Note:
1. When the camera you purchased is equipped with WIFI function, you do not need to format the memory card.
①support 8G, 16G, 32G, 64G, 128G memory card
2. When the camera you purchased does not have WIFI function,
①8G, 16G, 32G memory cards do not need to be formatted
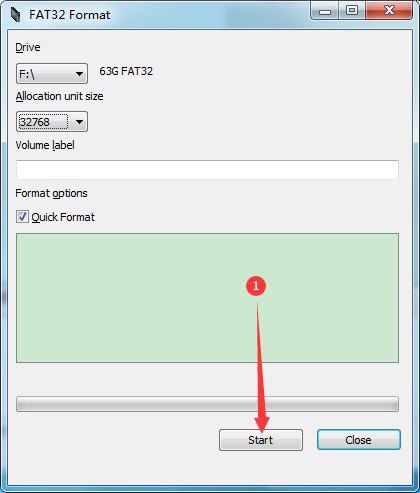
② If it is a 64G memory card, due to the chip, you need to format the memory card into FAT32 format as follows:
Windows
Mac
1. Connect the SD card to the Mac OS X computer.
2. Search for Disk Utility in Launchpad and open it.
3. Select the Drive and click Erase.
4. Enter the new name (OPTIONAL).
5. Select MS-DOS(FAT) for Format.
6. Select Master Boot Record for Scheme.
7. Click Erase.


U21

T9
XD wifi


U11

XD

W6 Pro

W6 wifi
About us
rettrucamera

Daily consultation time: 9:00 - 18:00 (Beijing time)


+8617137629757
Rettru Camera

Rettru Camera

17137629757

Rettru Camera
Rettru365@gmail.com